Shop
Home

Master Bedroom Inspiration

We moved into our home nearly a year ago, and it’s finally time to tackle our Master bedroom.

We already own a lovely master bedroom set that may eventually get a little paint and update, but for now does nicely.  I know I want the room to feel airy, romantic, clean, and calm!

I tend to decorate on the more modern side, however want our bedroom to have a modern yet soft feel.  Below are some of my favorite inspiration rooms from Pinterest, and a board I’ve been making for inspiration.  I want the room to have lots of white, with blush, grey, navy, and mixed metals.  I will also try to incorporate some natural wood for my husbands sake!

I love the overly romantic and soft feel of the first picture, however the second has a bit more of my modern feel I tend to go for.  I will probably try to mix both styles.

Sources:

Floor lamp// Faux Fur pillow//Buffalo Plaid Pillow// Print//

Drawer Pulls // Bubble Lamp // Mirror // Bench (Similar)

Hopefully Ill be updating you all with an actual room here soon!

XOXO ARIN

SaveSave

Family

Organizing Photos and Memories

This weeks ‘What I’m Nesting’ post is pretty simple.  I have spent most of my free time the past week finishing up Shutterfly books with our family photos.

Organizing Photos - www.arinsolangeathome.com

If I had to say there is one thing that I am proud of sticking to as a mom, it is photo and memory organization.  I am a huge believer in making sure that the ease of taking photos in todays age doesn’t actually turn out to be a negative when our children have no pictures to look back on.  As you add children and time starts to pass faster it’s harder to remember each little memory, so I have found if I stay on top of organizing the pictures in small time frames it works better.

As of now I do a Shutterfly book every 3 months (jan-march, april – june, and so on for each year).  Some years I have done one or two 6 month books because of less pictures, but especially while the kids have been under 1 year old every 3 months works better.

The first page of each book I write about major things that happened during that time period.  For example: baby milestones, trips, concerts, or birthdays.

I also do individual books for major life events like birthday parties, family photo sessions, newborn photos, and situations like that so that I get them ALL in print.

For us this has worked well as a way to keep our family memories from being stuck in a photo real on our phones, and I love that if heaven forbid something were to happen to our albums I could reorder all of those books and have them right back.

Organizing Photos - www.arinsolangeathome.com

Other ways I organize memories and photos for our family:

Each of my kids have a baby book with monthly weights and all the other little milestones and photos.

I write in a notebook to the kiddos every 6 months (or so) with what life has looked like.  I figure someday they will love to get those letters from me!!

Last would be videos – which I have been trying to figure out.  I would love to know what you all have done to organize your videos of your kids or family. I think I will look for someone who can just compile all the videos I have taken over the past 4 years and do that every few years to put on DVD so they have home movies!

This is a really simple, but time consuming task to do, but it’s something I challenge all you other mamas to start – you will LOVE to look back on them.  Hopefully I’ll be back later this week with a couple of DIY and home decor posts.  I have been working non stop on our master bedroom and nursery – but the nursery won’t be revealed until baby bear is here!


XO ARIN

Products we Love

Toddler Travel Must Haves

Road trips with kids… they are certainly the most affordable and “easy” way to travel these days, but stressful none the less.  We travel pretty frequently with our kiddos, and drive 12/14 hours to the beach 1-2 times a year, minimum.  Over the past 4.5 years I have sort of pared down, and ‘perfected’ the items I take with us as staples for toddler travel must haves, then add to it as I go.

**We have TV’s in the head rests of my cars, so I am not ashamed to say that Ipads and movies are also a big help during travel for us.  As with anything else as long as it isn’t a habit its not something i worry about — I don’t think their brains will turn to mush from a day or two of that on occasion.

Below are some of my “must pack items” for vacations with kids.  I will link all items below.

collage of toddler travel items


  1. Kids CamelBak Eddy water bottle: These are my favorite water bottles and when we travel I make sure to bring two along for each kiddo.
  2. Keenz Stroller Wagon: This is fairly new and we are only on trip #2 with it, but its AMAZING.  I hate pulling wagons, but there is no denying that they are the most functional option to use on beach trips – This wagon fixes that issue!  There are too many amazing features to list about this item – so check out the site!
  3. The Shrunks Toddler Blow up Bed: total space saver, and you just have to throw a crib sheet over the “mattress” portion.
  4. Replay Recycled Snack Stacks: These are by far my favorite travel food item for the kids at their current ages.  I have 4 sets and always pack 3/4 stacked with different opened snacks in their backpack.  Cuts down on trash for about 10 min too.. ha.
  5. Pottery Barn Kids Backpacks: By far my favorite backpacks for the kids, and I pack each of them up a backpack for the car with snacks, waters, toys and books.
  6. Target Utility Totes: Not sure if these are sold during non summer seasons, but they are about $5 and AMAZING.  They are similar to the Thirty One bags that people love.  I typically load one with beach/pool toys, and one with indoor toys and such. (similar on Amazon here!)
  7. Little Unicorn quilts: I have said it before.  Best toddler blankets.  But I love that they aren’t too warm so they can use them in the warmer weather and the car without over heating.
  8. GoPod: I obviously didn’t take that on this trip, however if you have a baby its the best investment ever.  Works like a travel jumper.  We even use it outside at home.
  9. Crayola Dry Erase Board Set: these are great for keeping them coloring and drawing without going through tons of paper, and a built in hard surface cuts down on tears.
  10. Multi-use lap tray: These are amazing over the kids laps in the car.  Makes eating in the car, coloring or even playing much better.  They have deep sides to hold odds and ends too.  The kids love them. (I used to own a sort of soft travel snack tray for use with car seats and I can vouch for this being a much better option!)

I would LOVE to hear what your favorite baby or toddler travel items are! We will be journeying out again not long after the baby arrives, and its been 2.5 years since I have hauled a baby along on one of these trips.

SaveSave

Food

Kid Cupboard Organization

If you have kids you know that even in the kitchen their stuff takes over.  Our kitchen is ample in size, but not massive, and I knew that I needed to get rid of a few things, and organize the cupboard I use for them in order to make room for baby items to join the mix.  I decided to do a post for you on our kid cupboard organization to show you all how we keep things tidy!

My favorite plates and bowls for the past year or so have been from replay recycled.  I love that they stack and are so durable. I decided it was time to invest in more of them and do away with all other plates and bowls.  I use their plates, bowls, sippy cups, and snack stacks and can’t say enough good things about all of the items! — Edited to add that now over a year later we have a growing stack of the flat plates also, and you can get a sneak peak of their adult line over on this post. 

inside of kitchen cupboard with kids items

stacks of replay recycled

replay recycled stacks

I also got rid of all water bottles aside from kids camelbaks.  All of them have their names on them in vinyl so I can easily take them to the gym/school/soccer and so on.

Aside from those items, I have a drawer with baby spoons and replay recycled silverware (SERIOUSLY the best silverware), and a second drawer with lidless cups and snack cups that the kids can access themselves for water or snacks.  This was a new move to help them be more self sufficient before the baby arrives, and I have loved it.

This weeks “nesting” was a simple easy fix, but really helped simplify another area of our kitchen…now to decide where to organize and clean for next week!

I would love to see what you have been up to.  Remember to tag me and use the hashtag #whatimnesting!

replay recycled stash


SaveSave

Family

Pantry Organization

So,  I don’t know about any of you other mama’s that are reading this, but the ‘nesting’ is a real thing here at my house.  I am naturally a fairly clean/organized/busy person, but when I’m pregnant it is NEXT LEVEL. This time I feel like its a combination of “finishing” the house, because the baby is arriving just over a year after move in, as well as trying to get things organized in a way that the kids and Sam can maintain while I’m trapped under a nursing baby.

I decided that I would post a weekly snap shot into “What I’m Nesting” incase anyone else needs inexpensive quick ways to organize and clean up their home!

WHAT I’M NESTING – week 1

Pantry Overhaul

Pantry Organization www.arinsolangeathome.com

Moving into our new home gave us so much more space, and there have only been one or two spaces that I felt we ‘downgraded’.  The pantry was one of those unfortunate areas.  It is an average size, however has sliding doors, which for me aren’t ideal due to hiding half the pantry.  Due to the pantry’s location the only other doors possible are accordion style doors – and those make me so nervous with little fingers, so until I decide if a Butlers Pantry is for us, organization, and making the best of the space we have was really our only option.

Pantry Organization www.arinsolangeathome.com

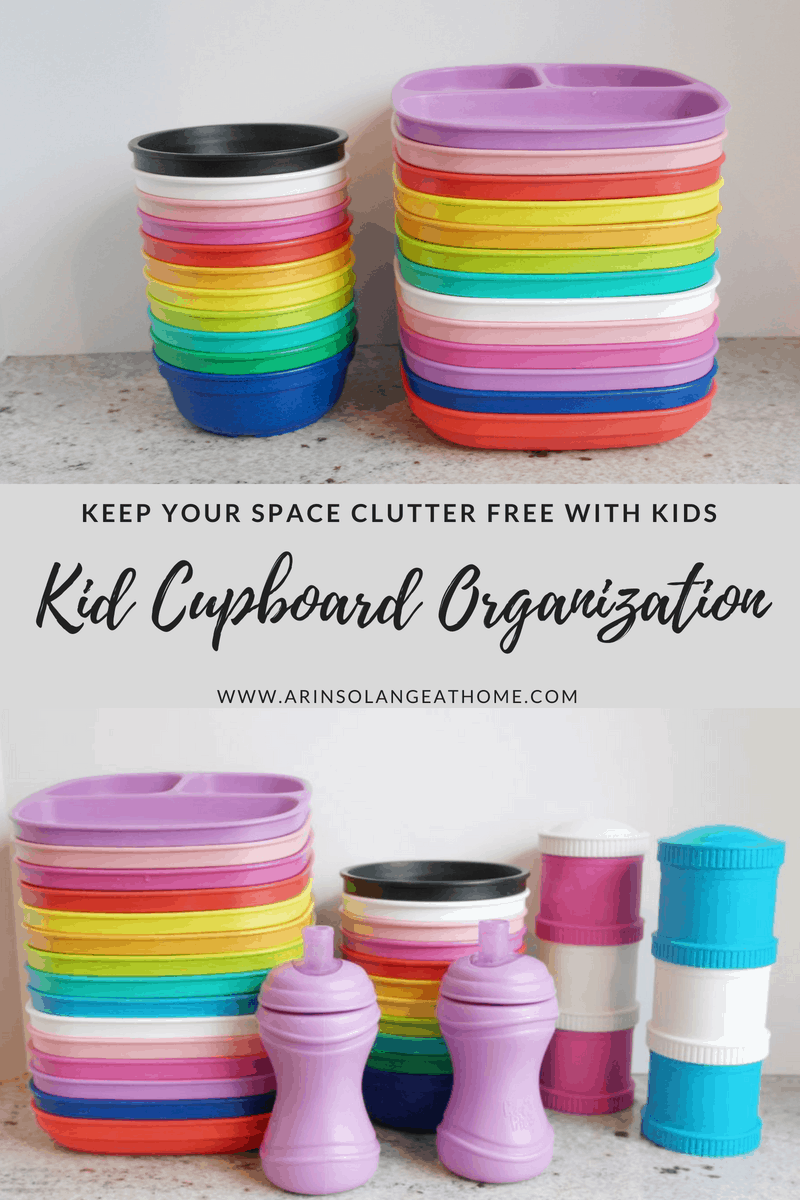
I decided that if similar items were housed in bins together it would keep things a bit less cluttered and would allow for the kids to easily access snacks as well as Sam to put things away without my direction (Im a bit of a control freak- ha).

Something else I always do is keep the kids snacks on the bottom shelf where they are accessible to them, and out of boxes.  They can see all that’s offered and I don’t end up with empty boxes laying around.  (as a side note – I also do this because if we have sitters I can tell them that the bottom shelf of our pantry is “Jack safe”.  Jack has a serious egg allergy and although not everything in the house is egg free, everything for snacking within his reach is then safe for him to eat!)

Pantry Organization www.arinsolangeathome.com

The bins I used are both inexpensive, and great for use on wire shelving where wicker baskets would start to get shredded.

I labeled each bin using my Silhouette, however you could label it with a label maker or by buying chalk label stickers at your craft store.

I store my baking supplies in Oxo containers and again used my Silhouette to cut out labels.  This time I used some fun dry erase vinyl I had for the labels.  I love that I can easily change out what the label on these say.  I am always changing what I have on hand (like I’m on a serious homemade granola kick this pregnancy!)

Pantry Organization www.arinsolangeathome.com

I store my spices both on a 3 tier shelf (partially because getting them to stand on wire shelves was awful!) and to make it easier to see.  I also have a small 3 tier drawer for spices.  On the front of that I added the same dry erase vinyl to the front of those drawers in order to easily change what spices are in them instead of using the included labels (that are also a great option).

Pantry Organization www.arinsolangeathome.com

I use a Keurig drawer for our “odd” K-cups.  I store our daily K-cups in a glass vase next to the coffee pot, but love the drawer as a way to keep decaf, hot cocoa, and flavored options on hand and organized.

Pantry Organization www.arinsolangeathome.com

At the top of my pantry I keep a few things in rubbermaid containers that are also labeled, and I keep a large milk crate on the floor of my pantry for onions and potatoes.  There is also space on the floor for cases of water or things of that sort when needed.

Pantry Organization www.arinsolangeathome.com

Overall I have had our pantry organized for about a month while I’ve slowly added the labels and it has been amazing! For the first time I haven’t felt like my pantry was on a constant rotation of ‘newly cleaned’ to ‘needed cleaned again’.  I’m hoping this takes one frequent chore off my to-do list once our sweet baby arrives.

I would LOVE to hear your organization or “nesting” ideas for me to fill the next 12-15 weeks with.  Follow along and add your ideas in the comments or by using the hashtag #whatimnesting on Instagram!

XO ARIN

DIY

DIY Framed Poster

Okay, as promised in my updated foyer post, I had THE EASIEST DIY project for you all.  I wanted a large framed print hanging in our hallway but was set on it being more of a framed poster than art – so no glass.  I wanted something on a budget, so this DIY Framed Poster was born.


stay awhile print framed

Cost for mine will be for a 24×36 framed print – and it was less expensive because its black and white.

What you need:

Canvas stretchers from your craft store. (2 in the length, 2 in width). They sell them at Hobby Lobby and Michaels for sure, and are around $2 each full price.

A downloadable print.  You can try a free print, but if you want a larger print I would recommend buying one off Etsy. Mine was only $5.

Staple gun (preferred but you could use adhesive)

Super glue

Stain if you would like

Picture hanger from hardware store ($1)

Steps:

Download your print of choice

Print from preferred printer.  I used Fedex for this print to have it the next day, but MPIX is another of my favorites.  If printing at MPIX choose e-surface paper

Attach your canvas stretchers into a frame shape. (trust me a monkey could do this)

Add some super glue into the corners to help it stay

Stain if desired

Staple print to back

Attach picture hanger to the back

Hang on the wall and enjoy!

stay awhile poster

This truly is so easy, and I had never thought of using the canvas stretchers for such a project.  All in all this project cost me $47 ($35 for print, $1 for picture hanger, $10 for canvas stretchers.  I owned everything else)

If you decide to give this a try leave me a picture of your finished product! I would love to see it!


(UPDATE: this has since moved to our guest room – to see what hangs there now, check out my most popular post for an amazing IKEA hack)

diy poster hack

SaveSave

SaveSave

DIY

Updating our Foyer

We have lived in our house for nearly a year with NOTHING happening in the foyer.  Its a small-ish space, and I wanted to be really careful about making it feel cluttered. I think with the right pieces you can really make your entry way a beautiful space no matter the size.  So read below to see how we went about decorating a small entry way.

For starters, when we moved in there was a formal living room to the right of our front door.  We had no use for this space, but since Sam works from home a home office was a must, so we had the entryway reconfigured a bit and french doors added to that space.

small gold entry way table with modern decor

We changed out the current light for something a bit more modern (but something small because the ceilings aren’t vaulted).

entry way decor

After months of looking I found the perfect little foyer table that fit in our small spot.  I tend to learn towards a homey mid-century decor feel, so I was really drawn to the mirror but we will see if I eventually change it for something larger.  All decor will be linked if possible, or something similar.  We are a young family, so most of my decor I try to find on big sales – so sometimes its hard to link the exact options.

(the table and mirror were both target Threshold but have come and gone)

small entry way(side note – the books that I have on this table and use several other places in my house are all from thrift stores.  I go to the book section and look for semi neutral books with titles that won’t scare my guests, and remove the dust covers)

The “Stay awhile” sign that is hung will be a quick DIY post this week that you will definitely want to check out.  It was easy as can be, and to frame it cost me $15 dollars!diy photo frame

In our past home I built wooden baby gates for our stairways and LOVED them, but the way our spindles are in this house makes that nearly impossible (they are so thin, and the curved hand rail) so instead we went with a traditional metal baby gate.  To help it look a bit better, I sewed a knit cover for it that can be easily slid off to be washed or changed out.

fabric baby gate cover

I went back and forth on a rug.  We can’t do small doorway rugs in this house because the doors won’t pass over them (thus they cause more headache than they are worth), but I have gone back and forth on a runner.  For now I decided against it, as we have so much carpet in the house I wanted to show the wood that we have.  I do store a turkish towel in the basket to lay down or have people wipe their feet if needed.  Let me know if you have any questions on this post and be sure to check out our home tour tab –  a full update for the next year is coming soon.

PAINT COLOR: Behr Irish Mist

SOURCES:  Basket (similar) // Candle // vases (similar) // plant // print